How to Ship Live-Selling Orders: A Simple Shipping Workflow for Resellers
Use this simple sticker system to organize, pack, and ship orders from Whatnot, TikTok Shop, eBay, or wherever you sell online.
Shipping can feel like the most intimidating part of starting a live-selling or reselling business.
Selling the product is exciting. Then the show ends, you look at the pile of sold inventory, and realize every item must make it to the right buyer.
I understand that feeling because I’ve made some painful shipping mistakes.
During one of the worst shipping days of my reselling journey, more than 200 packages were returned to my front door because the package dimensions were wrong. Each one had a red stamp telling me the label was voided and needed to be repurchased.
I cried. I panicked. I thought I had ruined my business.
But that mistake forced me to learn how shipping really works—and how important it is to create a system before your sales begin growing.
Shipping became much easier when I stopped relying on my memory and started following the same simple workflow after every sale.
Today, I’m sharing that workflow with you.
What Is the Simplest Shipping Workflow for Live Sellers?
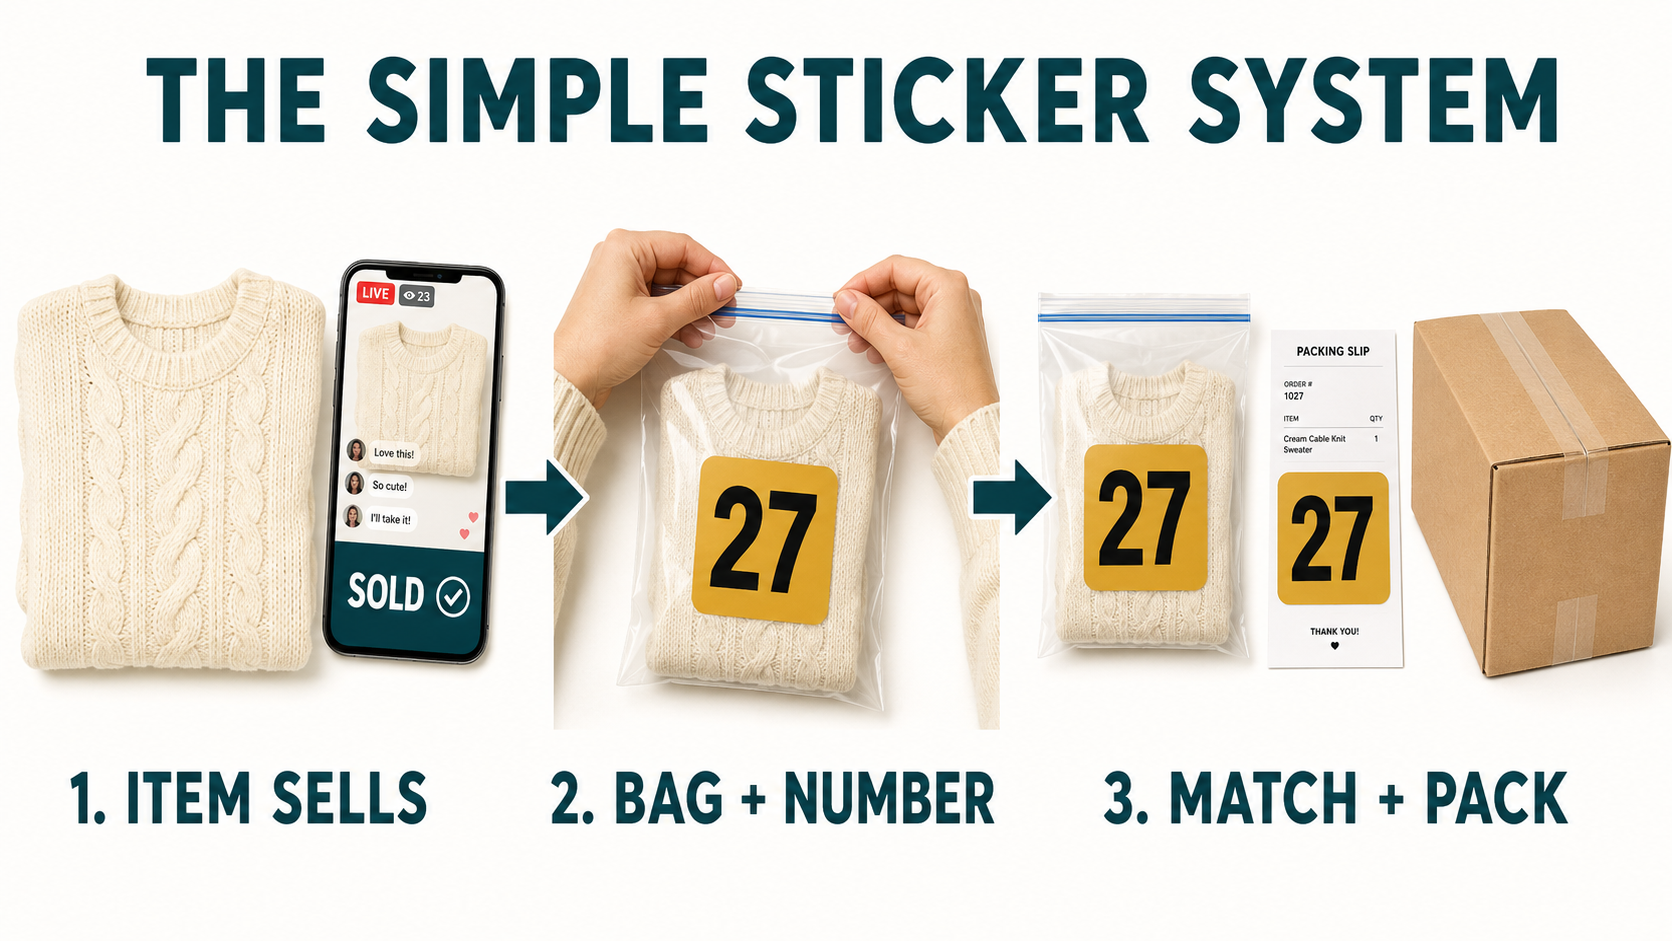
The easiest way to organize live-selling orders is to assign a number to every sold item as soon as it sells.
Place the item in a clear bag or designated area, attach the matching numbered sticker, and keep sold products in numerical order. After the show, use the platform’s packing slips or order details to match each number to the correct buyer.
Then pack one order at a time, verify the final weight and dimensions, attach the correct label, and move the completed package into a separate shipping area.
The basic workflow is:
Prepare your shipping supplies and numbered stickers.
Assign a number to every sold item.
Say the number aloud during the live.
Place the item in a clear bag or designated bin.
Keep sold items in numerical order.
Match the numbers to each buyer after the show.
Pack and verify one order at a time.
Weigh and measure the finished package.
Attach the correct shipping label.
Drop off the package and confirm it receives a scan.
The system is simple on purpose.
If you can’t tell where an item belongs at a glance, your system is too complicated.
Why Live Sellers Need a Shipping System
During a live show, your brain is doing a hundred things at once.
You may be:
Talking to viewers
Answering questions
Running auctions
Pinning products
Checking sizes
Showing product details
Watching the chat
Keeping the show entertaining
Tracking what sold
Preparing the next item
It’s easy to believe you’ll remember which product went to which buyer.
You probably won’t—and that’s okay.
Your shipping workflow should never depend on you remembering everything after a long show.
A repeatable system can help prevent:
Sending the wrong item
Forgetting part of a bundle
Mixing two buyers’ orders
Losing a sold product
Accidentally reselling an item
Using the wrong shipping label
Entering an incorrect package weight
Staying up until midnight trying to reconstruct the show
The best shipping system is the one that still works when you’re exhausted, distracted, or interrupted by your children.
The Supplies You Need to Ship Reseller Orders
You don’t need an expensive warehouse setup to create an organized shipping station.
Start with:
Removable numbered stickers
Blank labels and a permanent marker as backup
Clear zipper bags or poly bags
Bins, baskets, or long boxes for sold inventory
A separate space for unsold products
A reliable shipping scale
A measuring tape
Mailers and shipping boxes
Packing paper, bubble wrap, or other protective materials
Packing tape
A printer
Shipping labels or printer paper
A designated area for completed packages
A thermal printer can make printing shipping labels faster, but it isn’t required for your first sales. Use the equipment you already have and upgrade after your order volume grows.
Step 1: Prepare Before Your Live-Selling Show
A smooth shipping day begins before you hit the Go Live button.
Preprint Your Numbered Stickers
Prepare enough numbered stickers for the number of products you expect to sell.
For example, if you plan to run 50 items, prepare stickers numbered 1 through 50. It’s always helpful to print extras in case the show goes better than expected.
Cindy’s downloadable number file includes numbers 1 through 1,000, so you can print only the range you need for each show.
You can also use blank removable labels and write the numbers by hand, but preprinted numbers reduce the chance of messy or unreadable handwriting.
Create Three Inventory Areas
Before the show, designate separate areas for:
Products waiting to be shown
Sold products
Unsold products
Never place a sold product back into the original inventory pile.
This simple separation prevents an item from being shown or sold twice.
Organize Your Packaging Supplies
Place your bags, number stickers, marker, and sold-item bins within reach.
If you have a helper, explain the system before the show starts. That person should know exactly where sold items go and how the numbers are assigned.
Review Your Shipping Settings
Before listing products, confirm that your shipping profiles reflect the product’s expected packed weight, including the item, mailer or box, and protective materials.
For Whatnot sellers, the platform uses shipping profiles to calculate buyer shipping costs, generate labels, and determine how purchases may be bundled. Whatnot recommends using the packed weight—not only the weight of the item—and adding dimensions when required. Review Whatnot’s current shipping-profile instructions.
Shipping settings and carrier policies change, so review your platform’s current requirements instead of depending on an old screenshot or tutorial.
Step 2: Give Every Sold Item a Number
As soon as an item sells, assign it the next available number.
For example:
First item sold: Sticker #1
Second item sold: Sticker #2
Third item sold: Sticker #3
Place the numbered sticker directly on the clear bag holding the item or on a removable area that will not damage the product.
The number becomes the item’s temporary identity until it is matched to the buyer and packed.
Say the Number Out Loud
When an item sells, say the number aloud:
“This is sold item number 27.”
This creates a verbal record inside your show recording.
If a sticker falls off or you become confused later, you can review the recording and hear which number was assigned to the item.
This one habit can save you from hours of guessing.
Put the Item Away Immediately
Don’t leave a sold item sitting beside you while you run three more products.
As soon as the sale is complete:
Assign the number.
Place the product in its bag.
Attach the sticker.
Put it in the sold inventory area.
Move to the next product.
Finishing the process immediately prevents unfinished tasks from piling up during the show.
Step 3: Keep Sold Items in Numerical Order
As numbered items are placed into your sold inventory area, keep them in order.
Item #1 should come before #2. Item #25 should be easy to locate without searching through a random pile.
Depending on your order volume, you can use:
One long box
Multiple numbered bins
Shelves divided into number ranges
Rolling carts
Tables divided into sections
For example:
Bin one: Items 1–25
Bin two: Items 26–50
Bin three: Items 51–75
Bin four: Items 76–100
The exact setup doesn’t matter as long as you can quickly find every number.
Nothing should overlap or be stacked “temporarily” in another area.
If an item has a sticker, it needs a home.
What If One Buyer Purchases Multiple Items?
If a buyer wins several separate products during your show, keep the original number on each product.
For example, Susie may have purchased:
Sold item #1
Sold item #17
Sold item #42
After the show, your platform’s order details or packing slip will show which items belong in Susie’s shipment. You can then collect numbers 1, 17, and 42 and pack them together if the platform has bundled them into one shipment.
Don’t assume separate purchases should always be placed in one package. Confirm how the platform has bundled the order and which shipping label applies.
What If You Sell a Product Bundle?
If several products were sold together as one listing, keep every piece of that bundle together under the same number.
For example, if a three-piece clothing bundle sells as item #12:
Place all three pieces together.
Attach #12 to the outer bag.
Confirm that all three pieces are present before packing.
You can also place a #12 sticker on each individual piece if there is any chance the bundle could become separated.
Step 4: Separate Sold and Unsold Inventory
When your show ends, don’t begin printing labels immediately.
First, reset the room.
Confirm that:
Every sold item has a number.
Sold products are in the correct area.
Unsold products are returned to inventory.
Bundles contain all their pieces.
Damaged or questionable items are moved into a separate problem area.
No unlabeled products remain near the sold inventory.
This five-minute reset can prevent a much bigger problem during packing.
Step 5: Review Orders Before Printing Labels
Open your platform’s seller dashboard and review every order before generating labels.
Check for:
Cancellation requests
Bundled purchases
Multiple purchases from the same buyer
Shipping-address warnings
Products that need special packaging
Incorrect weights or dimensions
Items that should ship separately
Notes connected to the order
On Whatnot, sellers can review shipments, correct package details, and confirm bundling before generating labels. Incorrect package information can lead to additional postage, returned packages, or label problems. See Whatnot’s current packing and shipping workflow.
Print Packing Slips When Helpful
Packing slips are optional on some platforms, but they can make order matching much easier.
Use the packing slip to identify every numbered item that belongs to the shipment.
Write the corresponding sticker numbers on the slip if they aren’t already shown clearly.
For example:
Buyer: Susie
Item #1
Item #17
Item #42
Then collect those numbers from your sold inventory area.
Step 6: Pack One Order at a Time
This is where the sticker system becomes powerful.
Follow the same sequence for every order:
Select one shipping label or packing slip.
Identify every numbered item belonging to that buyer.
Collect those items from the sold inventory area.
Confirm the items match the order.
Place them in the appropriate packaging.
Add the packing slip if you use one.
Leave the package open for the final check.
Weigh and measure the completed package.
Make any necessary shipping adjustment.
Seal the package.
Attach the correct label.
Move it into the completed shipping area.
Only after one order is finished should you move to the next.
What If You Get Interrupted?
Stop.
Don’t begin another order or place a new label on the table.
Finish the current step if it is safe to do so, then resume with the next clear number when you return.
Packing multiple open orders at the same time is one of the easiest ways to switch labels or forget items.
Step 7: Complete a Final Order Check
Before sealing the package, ask:
Is this the correct buyer?
Are all the numbered items present?
Is the product the correct size, color, or variation?
Did I include every piece of the bundle?
Does the condition match what I showed?
Are fragile items protected?
Is there unnecessary empty space?
Does the package match the label’s weight and dimensions?
If another person is helping you, use a two-person check for large or complicated orders.
One person collects and packs the products. The other person reviews the order before it is sealed.
Step 8: Weigh and Measure the Finished Package
Don’t weigh only the product.
The final shipping weight includes:
The item
The box or mailer
Bubble wrap
Packing paper
Protective inserts
The packing slip
Any other material inside the package
Dimensions matter too.
Measure the final sealed box instead of guessing based on what the box is called. Carriers and selling platforms may use package dimensions when calculating the correct service or postage.
USPS also applies parcel size and weight standards, so always compare the completed package with the carrier requirements attached to your service. Review current USPS parcel standards.
If the final package doesn’t match the shipment information, correct it through the selling platform before mailing it.
That extra minute is much easier than having 200 packages returned.
Step 9: Attach the Correct Shipping Label
After verifying the package:
Seal it securely.
Match the label to the correct buyer.
Place the label on a flat surface.
Keep the barcode fully visible.
Remove or cover old shipping labels if reusing a box.
Confirm the return address.
Move the package into the completed area.
On Whatnot, shipping labels are generated after a sale through the Shipments page. Sellers generally use the platform’s prepaid label unless specifically approved for Bring Your Own Label. See Whatnot’s current label instructions.
Never place labels for multiple buyers on your table at the same time unless you have a clear process for keeping them separated.
Step 10: Drop Off and Confirm Shipment
Keep completed packages together until they’re ready for carrier pickup or drop-off.
Whenever possible:
Use the carrier shown on the label.
Get an acceptance or drop-off scan.
Keep the receipt.
Confirm tracking begins updating.
Save any available manifest or scan form.
Check that no completed packages remain in your workspace.
Whatnot currently requires most sellers to ship and receive a qualifying drop-off scan within two business days, excluding weekends and holidays. Creating a label alone does not count as shipping. Review Whatnot’s current seller shipping policy.
Other platforms may use different deadlines, so always check the rules for the marketplace where the sale occurred.
What to Do When You Can’t Identify an Item
Even with a good system, mistakes can happen.
If you have a product but don’t know which order it belongs to:
Stop packing.
Check the numbered sticker.
Review the order details or packing slips.
Look at the products sold immediately before and after it.
Review the show recording or video receipt.
Confirm the product, buyer, and sale before shipping.
Whatnot currently gives sellers access to full show recordings and video receipts for up to 60 days after a show. These can help confirm what was presented and purchased. Learn how to access Whatnot show recordings and video receipts.
Never guess just to finish the shipping pile.
Taking five extra minutes to confirm an order is better than sending the wrong product and creating a customer-service problem.
A Simple Reseller Shipping Checklist
Before the Show
Review shipping profiles.
Check product weights and expected packaging.
Prepare numbered stickers.
Set up sold and unsold inventory areas.
Place clear bags and bins within reach.
Test your printer and scale.
Make sure you have enough packaging supplies.
During the Show
Assign a number immediately after each sale.
Say the number aloud.
Place the item in a clear bag.
Attach the numbered sticker.
Keep sold inventory in numerical order.
Keep bundles together.
Never return a sold item to the unsold pile.
After the Show
Reset and inspect the sold inventory area.
Review orders and cancellation requests.
Confirm platform bundling.
Print packing slips and labels.
Match numbers to each buyer.
Pack one order at a time.
Complete a final item check.
Weigh and measure the finished package.
Correct shipping details when necessary.
Seal and label the package.
Move it to the completed shipping area.
Drop it off and obtain a scan.
How This Shipping System Scales
You don’t need to replace the sticker system when your business grows. You expand the physical setup around it.
As your order volume increases, you can add:
More numbered bins
Shelves divided into number ranges
Rolling carts
Separate packing stations
Employees assigned to specific steps
A quality-control station
A simple order-tracking spreadsheet
Carrier manifests for large drop-offs
Written standard operating procedures
The same basic rule continues to apply:
Every sold item receives an identity, every item has a home, and every order follows the same packing sequence.
That is what makes a workflow trainable.
If you hire someone in the future, she shouldn’t need to ask you where every product goes. She should be able to follow the same system you follow.
Common Live-Selling Shipping Mistakes
Relying on Memory
You may remember 10 sales. You probably won’t remember 100. Label every item immediately.
Leaving Sold Items Beside You
A sold item without a number can easily become mixed with the next product.
Creating Random Piles
Sold, unsold, bundled, and problem inventory need separate homes.
Packing Multiple Orders at Once
Finish one order before opening the next.
Assuming Every Purchase Is Bundled
Check the platform’s shipment details before combining purchases.
Forgetting Part of a Product Bundle
Keep every part together under one number.
Using the Product Weight Instead of Packed Weight
Include the mailer, box, padding, and all other packaging materials.
Ignoring Package Dimensions
The box’s measurements can affect postage just as much as its weight.
Sealing the Box Before Checking It
Leave the package open until the products, weight, and label have been verified.
Guessing When Something Doesn’t Match
Stop and review the order record or show recording.
Mixing Completed and Unfinished Packages
Create a separate area for sealed, verified, and labeled orders.
Live-Selling Shipping FAQ
How do I keep track of products sold during a live show?
Assign a sequential number to every product immediately after it sells. Place the product in a clear bag, attach the matching numbered sticker, and keep sold products in numerical order.
What if the same buyer purchases several items?
Keep each sale’s original number. After the show, use the platform’s packing slip or shipment details to identify all the numbered products belonging to that buyer.
Should I print shipping labels before going live?
Usually, you should prepare your numbered organization stickers before the show and generate carrier labels after the orders are complete. Follow the process required by your selling platform.
Do I need a thermal printer?
No. You can begin with a standard printer. A thermal printer becomes helpful when your shipping volume increases.
What is the most important shipping tool for a new reseller?
A reliable shipping scale is essential. Numbered stickers, clear bags, and designated inventory areas are also inexpensive tools that can prevent expensive mistakes.
Should I include packaging when weighing an order?
Yes. Use the total packed weight, including the product, box or mailer, padding, and other packaging materials.
How quickly should I ship live-selling orders?
Shipping deadlines vary by platform. Whatnot currently requires most orders to receive a shipment confirmation or drop-off scan within two business days. Always verify your platform’s current policy.
What should I do if I lose track of an item?
Stop packing and review the sticker number, order details, packing slips, and available show recording. Don’t ship until you are confident that the item is matched to the correct buyer.
Can this system work for eBay, TikTok Shop, or other platforms?
Yes. The platform’s order numbers and label process may be different, but the same workflow applies: identify every item, keep orders separated, verify the shipment, and pack one buyer at a time.
Your Shipping System Should Make Your Life Easier
A shipping system doesn’t need to be complicated to be professional.
You don’t need an expensive warehouse management program when you’re packing your first 10 orders.
You need a system that prevents you from relying on your memory.
Number the item. Give it a home. Match it to the buyer. Pack one order at a time. Verify the final package. Ship it on time.
Then repeat the process after every show.
Mistakes may still happen. They happen to every reseller—including me.
The goal isn’t to become perfect. The goal is to create a system that helps you catch mistakes before they reach your customer.
Download Cindy’s Live Seller Shipping System
Want the exact system beside you during your next show?
Download Cindy’s Live Sticker System and the printable number file with labels numbered 1 through 1,000.
Use them to organize sold inventory, match products to buyers, and make your next shipping day easier.
Learn From My Biggest Shipping Mistake
Want to hear the story of the day more than 200 packages were returned to my front door?
Listen to How I Survived My Worst Shipping Mistake Ever to learn what happened, how I fixed it, and what I wish every new live seller understood about shipping.
About Cindy Calderon
Cindy Calderon is a multi-seven-figure reseller, one of TikTok’s top live sellers, and the founder of Moms & Crumbs.
After starting as a stay-at-home mom of four with $60,000 in debt, Cindy built a live-selling business that has shipped more than 400,000 orders and earned more than 70,000 five-star reviews.
She now helps aspiring sellers source smarter, sell confidently, ship accurately, and build real income through live selling.
Final reminder: If you can point to a sold item and immediately know where it belongs, your system is working. Keep it simple, make it repeatable, and never depend on memory.